RoboClaw motor controllers offer three battery configuration modes: manual user settings, cell count, and auto. Each mode sets the minimum and maximum battery voltages the controller will allow, protecting the battery from undervoltage and overvoltage damage. Manual user settings is the recommended mode for most applications.
All batteries have minimum and maximum voltages that should not be violated or damage to the battery may occur. These values are a function of the battery’s chemistry and physical construction. This guide covers how to determine the correct limits for a LiPO battery and how to configure them in Motion Studio using each of the three modes.
A Quick Word About LiPO Batteries
There are several parameters of LiPO batteries you will need to know to follow this guide. Most important is the cell count, which is the number of physical battery cells that make up the battery. On some batteries the cell count is labeled, such as “2 cell” or “3 cell”. If this is not the case, the voltage of the battery should be labeled, for example “7.4 volt” or “11.1 volt”. To get the number of cells, divide the total voltage of the battery by 3.7, which is the nominal voltage of a single cell.
You also need to pay attention to the maximum and minimum total voltage of your battery. The maximum safe voltage of a single LiPO cell is 4.2 volts. The minimum safe voltage of a single LiPO cell is anywhere between 3.0 and 3.5 volts. Multiply by the cell count to find the maximum and minimum voltages that will be used to configure the RoboClaw. The table below lists the minimum and maximum voltages by LiPO cell count.
| Cells | Minimum Voltage | Maximum Voltage |
|---|---|---|
| 2 | 6.0-7.0V | 8.4V |
| 3 | 9.0-10.5V | 12.6V |
| 4 | 12.0-14.0V | 16.8V |
| 5 | 15.0-17.5V | 21.0V |
| 6 | 18.0-21.0V | 25.2V |
| 7 | 21.0-24.5V | 29.4V |
| 8 | 24.0-28.0V | 33.6V |
| 9 | 27.0-31.5V | 37.8V |
| 10 | 30.0-35.0V | 42.0V |
| 11 | 33.0-38.5V | 46.2V |
| 12 | 36.0-42.0V | 50.4V |
| 13 | 39.0-45.5V | 54.6V |
| 14 | 42.0-49.0V | 58.8V |
| 15 | 45.0-52.5V | 63.0V |
| 16 | 48.0-56.0V | 67.2V |
| 17 | 51.0-59.5V | 71.4V |
| 18 | 54.0-63.0V | 75.6V |
| 19 | 57.0-66.5V | 79.8V |
You may want to set the minimum and maximum voltages to 1 volt above and below the numbers you have calculated to allow for voltage swings that occur due to the operation of the motors.
Always use a balance charger to charge your discharged LiPO batteries. A balance charger ensures that all the cells in a battery pack are charged to the same voltage.
Connecting the RoboClaw
-
Connect power to your RoboClaw as per the manual.
-
Connect a micro USB cable between the RoboClaw and your computer.
-
Open Motion Studio. In the upper left-hand corner of the application you should see a box labeled “Attached Devices”. Your RoboClaw should appear here; if not, check your USB connection and check that power has been properly applied to the RoboClaw.
-
If your device is listed, select it and click “Connect Selected Unit”. The Stat1 LED on the RoboClaw will begin flashing.
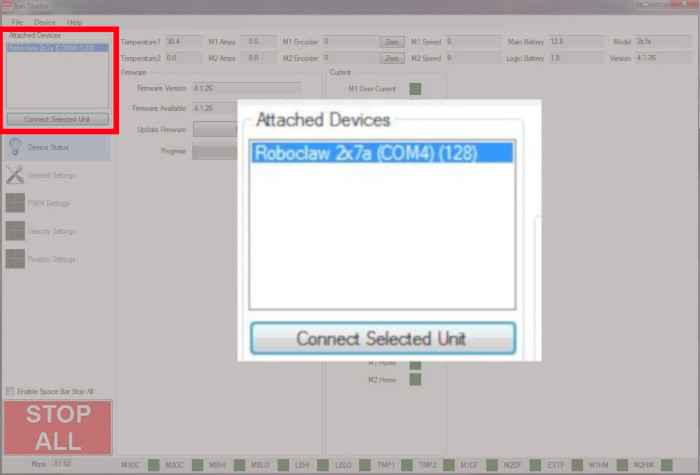
Figure 1: Location in Motion Studio where a RoboClaw is connected.
Where the Battery Settings Live
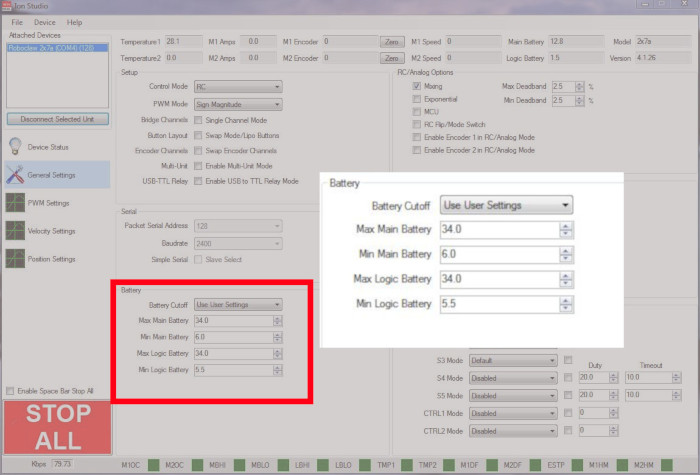
Each configuration mode is covered below. To configure the battery settings, click on “General Settings” in the left-hand side of Motion Studio and locate the section labeled “Battery”. This is the section used for the rest of this guide.
Manual User Settings Mode
This is the recommended battery configuration method for the RoboClaw. To use this method, select “Use user settings” from the drop-down in the Battery section mentioned earlier. Now you can set the minimum and maximum voltages for both the main battery and logic battery. Use the values calculated earlier to set these values in the boxes provided. Save the settings to the RoboClaw by going to the menu and selecting “Device” and then “Save Settings”.
Cell Count Mode
In this mode you simply set the number of LiPO cells in use and the RoboClaw sets the minimum and maximum voltages of the main battery based upon this. Open the drop-down and select the cell count of your battery. If you are using a separate logic battery, you can set the min and max values for it in the boxes provided. Save the settings to the RoboClaw by going to the menu and selecting “Device” and then “Save Settings”.
Auto Mode
When this option is set, the RoboClaw samples the voltage of the battery on startup and sets the minimum and maximum voltages automatically. As with cell count mode, you can manually set the min and max values of the logic battery separate from the auto setting for the main battery. When the RoboClaw is set to auto battery mode, the Stat2 LED will blink a number of times on startup to indicate the cell count it has set. Remember to save the settings to the RoboClaw by going to the menu and selecting “Device” and then “Save Settings”.
If the battery in use is undercharged or overcharged when the RoboClaw starts, auto mode will not be able to set the proper values and damage to the battery may occur.
Next Steps
With the battery settings configured, the RoboClaw will protect your batteries from both undervoltage and overvoltage conditions. These guides continue the setup process: