Introduction
The Raspberry Pi is one of the most popular single board computers in the robotics world. The Pi easily interfaces with the RoboClaw, allowing full control of the board and its available functionality. In this Application Note we’ll be using the RoboClaw in its packet serial mode. In packet serial mode the Pi is able to send commands to the RoboClaw as well as read data from it using the onboard UART.
Materials
(1) RoboClaw motor controller
(2) motors for RoboClaw
(1) battery for RoboClaw
(1) Raspberry Pi 3 or 3B+
(3) female to female jumper cables
(1) small screwdriver
(1) computer with BasicMicro Motion Studio installed
(1) micro USB cable for the RoboClaw
(1) power source for Raspberry Pi
(1) monitor, mouse and keyboard for the Raspberry Pi
(1) HDMI cable for Raspberry Pi
Let’s get started
1. Follow this tutorial to step 10 to prepare the RoboClaw.
2. Follow this tutorial to configure the serial port hardware on the Raspberry Pi.
3. Disconnect power from the RoboClaw if this hasn’t been done already.
4. Shutdown the Raspberry Pi.
5. Wire the Raspberry Pi and the RoboClaw together according to the table below.
| Raspberry Pi | RoboClaw |
| GPIO 14 | S1 signal pin (pin closest to board edge) |
| GPIO 15 | S2 signal pin (pin closest to board edge) |
| Any ground pin | S1 ground pin (pin closest to inside of board) |
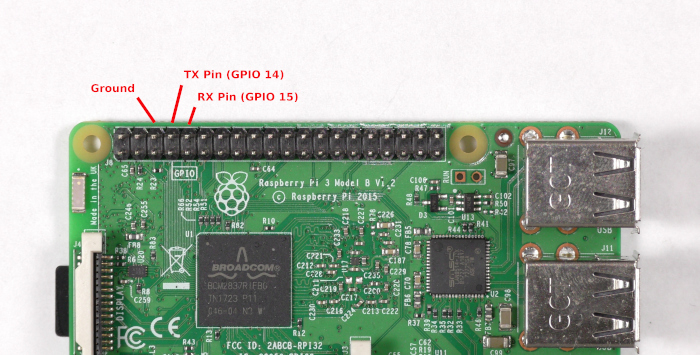
Figure 1: Pins to wire on Raspberry Pi.
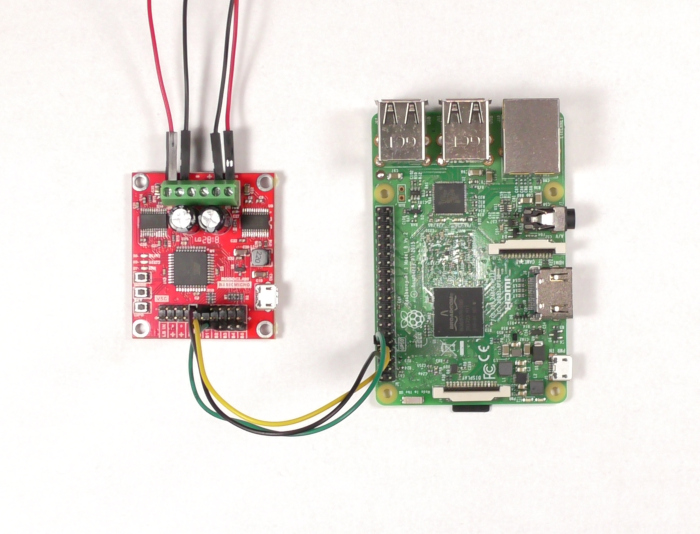
Figure 2: The Raspberry Pi and RoboClaw wired together.
6. Reconnect power to the RoboClaw.
7. Connect the RoboClaw to the computer with a micro USB cable. Open BasicMicro Motion Studio and connect the RoboClaw as done previously in the tutorial linked in step 1.
8. In the Motion Studio application click on “General Settings” in the left-hand pane. Now locate the pane titled “Setup”. Set the control mode to “Packet Serial”. Now move down to the pane labeled “Serial”. Set the address to 128 and the baudrate to 38400. In the menu at the top of the application select “Device” and then “Write Settings” to save the settings to the board. If this is not done the settings will not be saved to the board. Disconnect the RoboClaw by clicking “Disconnect Selected Unit” in the upper left-hand side of Motion Studio.

Figure 3: Serial configuration in Motion Studio.
9. Power up the Raspberry Pi by connecting power to it with the micro USB cable.
10. Ensure that the Raspberry Pi has access to an internet connection, either via wireless or a wired connection.
11. Next add the pyserial library to the Pi’s Python library. Open a terminal and enter the following command:
If pip is not installed on the Raspberry Pi it can be installed with the following commmand:
12. Dowload the test code for this tutorial from here.
The repository can also be cloned from GitHub from the commandline. Install Git with the following command:
Then clone the repository with the following command:
13. Unzip the code you’ve downloaded and navigate to the unzipped directory via the terminal. If you’ve cloned the repository with Git there is nothing to unzip. Run the code provided by entering the following:
14. Now that the example code is running you should see motor 1 running for two seconds and then stopping followed by motor2 doing the same.
Additional Notes
If the motors are not running as expected ensure that the connections between the Pi and the RoboClaw are secure. Also make sure that the TX and RX lines are not reversed. The TX from the Pi (GPIO 14) goes to the RX pin on the RoboClaw (S1 signal pin) and the RX from the Pi (GPIO 15) goes to the TX pin on the RoboClaw (S2 signal pin). Finally check to see if there is a solid common ground connection between the two boards.
In the example code the only two functions called are M1Forward and M2Forward. However there are dozens of functions to control the RoboClaw in the included Python library. In the downloaded example code the library file is called “roboclaw.py”. Browse through this file to see all of the functions that can be used with the RoboClaw.