Introduction
The Teensy microcontroller is a popular and powerful alternative to Arduino that is compatible with most Arduino code and libraries. This Application Note covers the simplest way to use a Teensy to control a RoboClaw motor controller.
Simple Serial Mode Explained
The simple serial mode of RoboClaw motor controllers is the easiest way to use a serial connection to control both motor channels. Single bytes are sent to the motor controller to control the speed and direction of one or both motors. A single byte has a range of values from 0-255 and values within this range are sent to the motor controller by writing to the serial port. The image below shows which values to send based on which motor to control, the direction to spin the motor and what speed the motor should spin at.
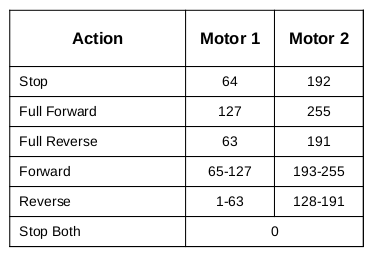
Figure 1: A table of the values to send to the RoboClaw for combinations of speed and direction.
Materials
(1) Teensy 3.2 microcontroller
(1) RoboClaw motor controller
(1) battery or power supply
(1) DC brushed motor
(1) breadboard
(2) female to male 0.1″ jumper wires
(1) micro USB cable
(1) computer with BasicMicro Motion Studio installed
(1) small screwdriver
(1) RoboClaw motor controller
(1) battery or power supply
(1) DC brushed motor
(1) breadboard
(2) female to male 0.1″ jumper wires
(1) micro USB cable
(1) computer with BasicMicro Motion Studio installed
(1) small screwdriver
Let’s Get Started
1. The Teensy’s header pins must be soldered on before starting this tutorial. Header pins are supplied with each brand new Teensy and should be soldered on with the pins facing down so that the Teensy can be inserted in to a breadboard.
Figure 2: A Teensy with header pins soldered on.
2. Begin setting up the Teensy by following these instructions to start setting up the Teensy micrcontroller. If a Teensy has been used previously with the computer being used this step and the next step can be skipped.
3. Next, the Teensy’s Arduino compatibility software must be installed and configures. Follow these instructions to install the software.
4. Follow this tutorial through step 10 to wire the motor and power connections to the RoboClaw.
5. Turn on the RoboClaw by connecting power to it.
6. Connect the RoboClaw to a computer using a mini USB cable.
7. Open Motion Studio and connect the RoboClaw by clicking “Connect Selected Unit”. Next click on “General Settings” on the left-hand side of the application. Locate the pane labeled “Setup” and set the control mode to “Simple Serial”. Now located the pane labeled “Serial” and set the baudrate to “38400”. To complete the RoboClaw’s configuration click on “Device” in the menu at the top of the application and then click on “Write Settings” in the menu that appears.
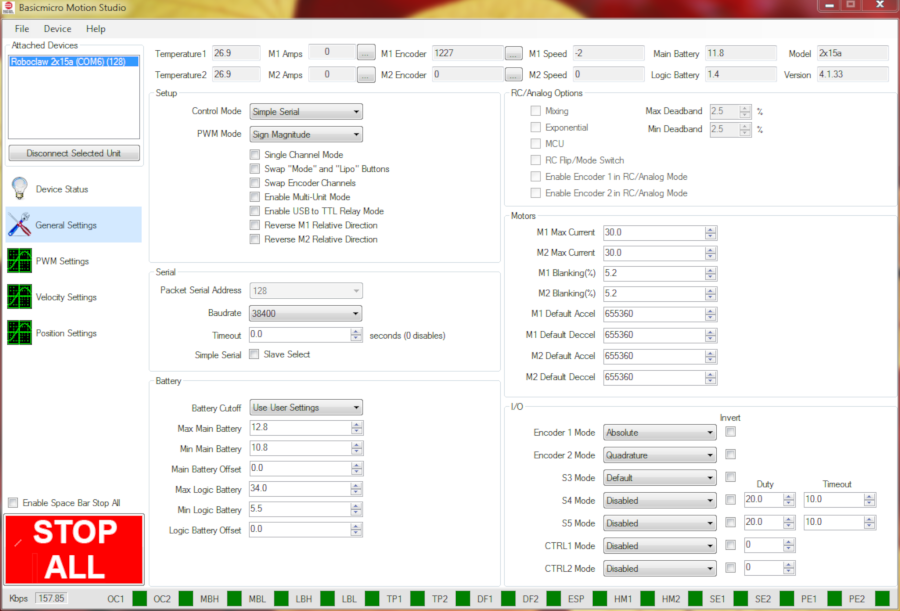
Figure 3: Control mode and serial settings for simple serial mode.
8. Disconnect the USB cable from the RoboClaw and then disconnect power from the RoboClaw.
9. Place the Teensy in the breadboard making sure it’s full seated then wire the RoboClaw and Teensy together according to the table below using a pair of female to male jumper cables.
| Function | Teensy | Roboclaw |
| Transmit | Pin 1 (see Teensy documentation for pinout diagram) | S1 signal pin (S1 header pin closest to the outside of the board) |
| Ground | Ground pin | S1 ground pin (S1 header pin closest to the inside of the board) |
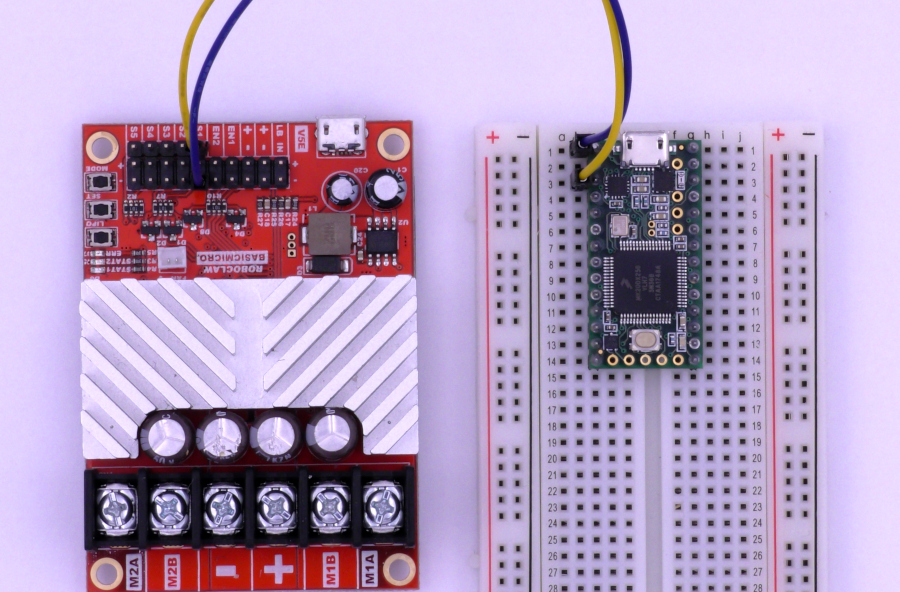
Figure 4: The Teensy and RoboClaw wired together.
10. Turn the RoboClaw back on by reconnecting power to it.
11. Connect the Teensy to the computer with a micro USB cable.
12. Download the code for this application note from Github. The code can be directly downloaded from here or from the commandline if Git is installed. The command below can be used to pull the code from GitHub via the commandline.
git clone https://github.com/basicmicro/teensy_simple_serial.git
13. Open the Arduino IDE and check that the Teensy Board and the proper comm port is selected from the “Tools” menu.
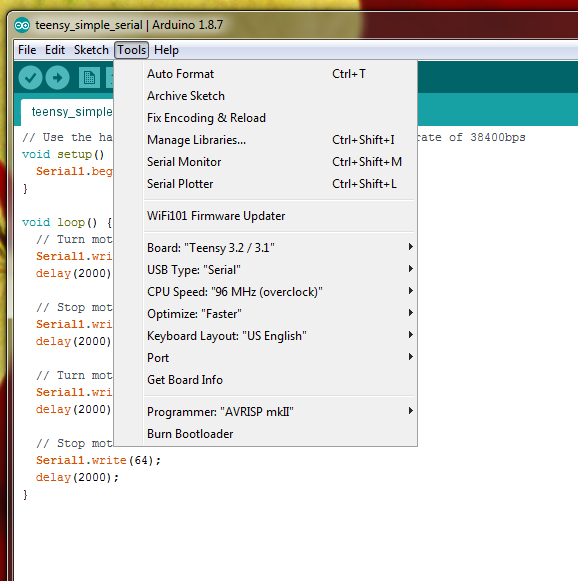
Figure 5: The tools menu of the Arduino IDE showing Teensy settings.
14. From the IDE open the code downloaded in the previous step. Click the checkmark labeled “Verify” to compile the project. The Teensy loader will open and prompt to press the button on the Teensy board. Finally, click on the upload button to send the compiled code to the Teensy board.
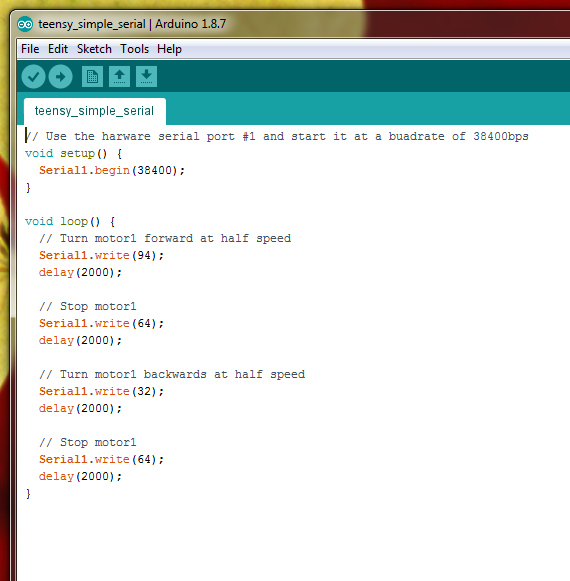
Figure 6: The example code opened in the Arduino IDE.
15. If everything is working correctly the motor should turn in the forward direction at half speed for two seconds, stop for two seconds and then turn in the reverse direction for two seconds before pausing and starting again.
Code Walkthrough
Serial1.begin(38400);
The first line of code found inside the setup function uses the pre-defined harware serial object “Serial1”. This object is associated with the first serial port on the Teensy and is used to control it. This line of code stars the serial port and sets its baudrate to 38400 bits per second.
Serial1.write(94);
delay(2000);
delay(2000);
The first block of code in the loop function sends the value of 94 over the serial port to the RoboClaw. This instructs the RoboClaw to turn motor one in the forwards direction at half speed. When the delay is started on the next line the RoboClaw continues to run the motor based on the last command sent to it.
Serial1.write(64);
delay(2000);
delay(2000);
The block of code looks similar to the last one expect it send a value of 64 to the RoboClaw which is the value at which the motor is stopped.
Serial1.write(32);
delay(2000);
delay(2000);
One again this block looks like the last. In this case the value of 32 is in the lower half of the specified range and means the motor will run backwards. Since it is exactly in the center of the backwards range the motor will turn at half speed.
Serial1.write(64);
delay(2000);
delay(2000);
The code finishes with another call to stop the motor and delay for two seconds.